Friday, December 16, 2011
Wednesday, December 14, 2011
Gmail prints too small - how to fix
Help forum
>
Gmail
>
Managing Settings and Mail
>
How do I modify font size for printing of messages ?
|
|
Report abuse |
|
|
boblite
Level 2
6/19/09 |
When I print Gmail messages the font size is way too small, and I can't find a way to modify the font size. How do I do this ?
Best answers
|
|
boblite
Level 2
6/21/09 |
Popular answer
Go to this answer
Finally a definitive fix. I visited the Firefox Mozilla
forum and said
I was having no difficulty printing Gmail e-mails in the Internet
Explorer
environment, but that font size was way too small when printing Gmails
in Firefox. A Mozilla moderator named Dan Raisch responded
with a fix that works, as follows: In the Firefox environment, check
File->Page
Setup->Scale. It should be set to 100% or thereabouts (adjust to your
preferred size). Is
"Shrink to fit page width" selected? If it is, un-select that
option."
Tuesday, December 13, 2011
Friday, December 2, 2011
Transfer Photos from iPhone to computer

You can easily transfer Photos from your iPhone to your computer, the process is very similar whether you are on a Mac or PC. Regardless of what OS you are using, you’ll need your iPhone, the included USB cable, and a computer to plug it into.
Transfer Photos from iPhone to Mac
The easiest way to transfer pictures from your iPhone to your Mac is through Preview- Plug your iPhone into your Mac
- Launch Preview
- From the File menu navigate down and select “Import from iPhone…”
- Select “Import All” to get all the pictures, otherwise individually select pictures and click ‘Import’
- Look in your ~/Pictures/ folder for the photos from your iPhone
Transfer Photos from iPhone to PC
On a Windows PC the easiest way to get pictures from your iPhone is to just use Windows Explorer, but there’s two ways to go about this:- Plugin your iPhone to the computer without iTunes running
- Wait for a popup asking you what you want to do with the device
- Select “View Content”
- Find your photos through the folders that are displayed
- Copy in Windows as usual
- Plugin your iPhone to your PC
- Open “My Computer”
- Find your iPhone, it will appear as any other camera would
- Open iPhone to find your Photos
- Select the pictures you want to copy to your computer and copy/paste them into the desired location on your PC
You can also sync your photos using just iTunes on either Mac OS or Windows but that is more for iPhone backup purposes.
Monday, October 17, 2011
Re-bootong win7 using Remote desktop
Sean’s Stuff
17 January, 2009
How to Reboot Machine While Connected Through Remote Desktop
I assume that everyone who uses Remote Desktop in Windows knows this already, but just in case…I use Remote Desktop all the time to connect back to one or more machines on my home network. I have a single static IP address and then have terminal server running on every box behind the router on a different port. So I can connect to any of my machines remotely, by using a different port.
Being able to remote connect to any/all of my machines is huge. I consider Remote Desktop to be one of the most critical tools that I use on a daily basis.
But I occasionally find that there is something funky on one of my home machines that leads to my wanting to reboot it. For example, I sometimes run into a situation where I can’t connect to the machine from outside my network, but I can still remote from a different machine in my home network. So I remote to the “visible” machine, then remote over to the “invisible” machine. Rebooting the problem machine seems to fix the problem.
The problem with rebooting is that the Shutdown and Restart options are removed from the Start Menu when you’re connected using Remote Desktop.
But not to worry–you can still reboot the machine, just using the command prompt. Here’s the magic command (Windows 7, Vista or Windows XP):
shutdown -t 0 -r -f
That’s a “zero” after the -t option, indicating shutdown in zero
seconds. The -r option indicates a restart, rather than shutdown.
(Don’t forget this one)! The -f option forces all applications to
terminate.So this is a critical command, worth remembering!
Wednesday, September 7, 2011
Port Forwarding Guide
For automatic port forwarding try Simple Port Forwarding
Step 1.
Some routers & modems work best with port forwarding if you have a static local IP.
Manually set your network interface card ( NIC ) to use a static ip address.
You can also download my FREE Simple Static IP tool to set it for you.
Step 2.
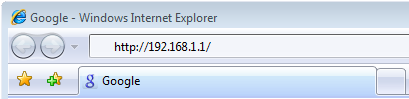
Open your favorite web browser and input your routers ip address in the address bar.
Please note that you must have the http:// in order to connect to your router/modem properly.
Need help finding you router IP address? Click here
Step 3.
Some router/modems require a username and/or password, if yours requires it, enter the routers username and password here.

If you don't know it you can check our list of default router and modem password list here.
If you have changed it and don't remember it you may have to reset your device to factory default using the reset button on most routers.
Step 4.
Once logged into your router click on the "Applications & Gaming" tab.

Click To View Full Picture
Step 5.
Click 'Port Range Forwarding'
Under 'Application Name' Give your entry a name, it must not be the same as any others on this page.
In 'Start ~ End Port' enter the ports to be forwarded.
Example: 2100 to 2200 or 3000 to 3000
Next select the protocol for the ports.
In the 'IP Address' field put the local IP of the computer the ports will be forwarded to.
On 'Enable' make sure to check mark it.
Repeat this step for all ports.
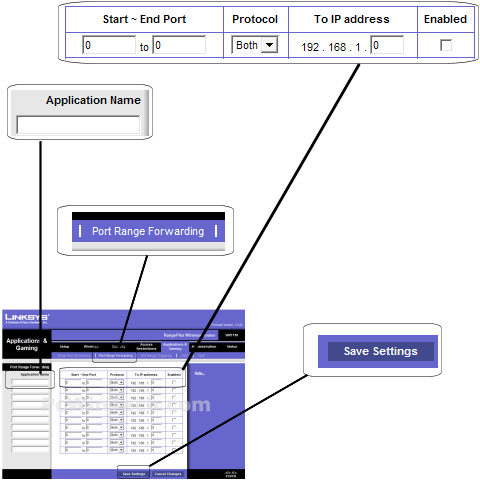
Click To View Full Picture
Step 6.
Click 'Save Settings'
All done!
Sunday, August 21, 2011
Set Gmail as Default Email Client in Firefox
Last year, Firefox 3 added the option to associate protocols with web applications. A common way to link to mail addresses is using the mailto: protocol, so you'll often find links like security@google.com.
When Firefox 3 was released, Yahoo Mail was the only webmail service that could be selected directly and the instructions for adding Gmail were complicated. Gmail has been added to the list of mail applications and it's easy to set it as the default email client in Firefox and open all the mailto: links in Gmail, without installing extensions:
* go to Tools > Options
* select the Applications tab
* search for mail
* select Use Gmail from the list of actions associated with the mailto protocol
* click OK to save the settings.

If you want to set Gmail as the default mail client for your computer and not just for Firefox, install Google Talk, Gmail Notifier for Windows or Google Notifier for Mac.
When Firefox 3 was released, Yahoo Mail was the only webmail service that could be selected directly and the instructions for adding Gmail were complicated. Gmail has been added to the list of mail applications and it's easy to set it as the default email client in Firefox and open all the mailto: links in Gmail, without installing extensions:
* go to Tools > Options
* select the Applications tab
* search for mail
* select Use Gmail from the list of actions associated with the mailto protocol
* click OK to save the settings.
If you want to set Gmail as the default mail client for your computer and not just for Firefox, install Google Talk, Gmail Notifier for Windows or Google Notifier for Mac.
Making Gmail your default mail application
Making Gmail your default mail application
- Download the Gmail Notifier.
- Right-click the Notifier icon in your system tray, and select Options.
- Check the box next to Use Gmail for internet mailto: links.
- Click OK.
- Download the Google Notifier.
- Open the Notifier.
- Click the Mail icon on the Menu bar and go to Preferences...
- Select the Gmail tab and choose Gmail as the program from the Compose mail in drop-down menu.
Saturday, August 13, 2011
Gmail default
How to make Gmail your default email program in Windows XP and Windows 7
One of the annoying things for people to try and figure out is how to make Gmail your default email account when clicking on mailto: links on web sites. By default, Windows will automatically try to open your Outlook account. This can be very annoying to a lot of people as the average user will have a web based email client like Gmail/ Hotmail etc instead of a program based one installed on their machines. Therefore if, like me, you click on a mailto: link when trying to contact someone on a site, Windows will try to open Outlook.
In this tutorial I will show you how to make Gmail your default email application in both Windows XP and Windows 7 via a step by step process. This is very simple and hopefully helpful. For both of these tutorials, I am assuming you have either Windows XP/ Windows 7 and a Gmail account already.
First we will deal with Windows XP. Go to the Google toolbar site and download the Gmail Notifier here, then accept the Terms of Service and install it.
Once this is installed you will be greeted with a window in the top left corner of your screen where you will need to input your email address and password as shown below:
 Make sure you check the ‘Remember my credentials’ box, so that it won’t keep asking you after every time you start your computer. Then click ‘OK’ and you will notice that a blue envelope icon (note: This will be white when there are no email unread) now appears in your task bar to the left of your clock. Now right click on the Notifier Icon and select ‘Options’
 The options window will enable you to make Gmail the default email for your mailto: links in multiple browsers including Chrome, Firefox and Internet Explorer. For me personally Chrome is my main browser, so I would select Chrome and then ‘OK’
You can check to see if you have done it correctly, but clicking on my mailto: link here
That’s it you’re done!
Next we will look at how to do this in Windows 7 using another program called Gmail Notifier for Windows 7 which you can download here.
Once you have installed the program you will see the following window where you get to select you language:
 Once you have clicked on your language preference it will then show you the next window where you will need to input your email address and password
 Once you have done that and clicked ‘OK’ you will notice the program icon (displayed as a red envelope) to the left of your clock in the task bar. Now to enable Gmail to be your default mailto: you have to go to the program options by right clicking on the envelope icon in the task bar and selecting ‘Preferences’
 You straight away notice that this program has a lot more options that the Gmail Notifier for XP does. First select the ‘Use Gmail for Mail To Links’ which will set the program to automatically open your Gmail account when you click on a email link on any website.
There are a few other options that I personally like to disable as I find then distracting. These are the ‘Sound Alert’ and ‘Tray Icon Blink’ options. If however you want to have a sound alert (the default one is a lady’s voice saying ‘Incoming Message’) you can select your own by clicking the ‘Select Sound File’ button at the bottom of the preferences screen and pointing to a sound file you have. Here is a great selection of free to download and use sound files that will work for you. They range from famous lines in films to sound effects. The program can only use .wav files (not mp3) so make sure you download the correct filetype. Again, if you want to test to see of you have done this correctly, you can test it by clicking on my mailto: link here.
This program supports the following languages:
- English,
- Français,
- Español,
- Italiano,
- Deutsch,
- Dutch,
- Русский, (Russian)
- Polski, (Polish)
- 日本語, (Japanese)
- 中文, 한국어 (Chinese)
That’s it, you’re done!
I am now moving all of my tutorials to my new site Fuzzy Tutorials, which is where I will also be adding newer ones.
Feedback Poll 4
The article helped meThe article was too confusing/ long-windedI'd like to see more techy subjectsOther:
This entry was posted in Computers, Default Email, Gmail, Install, Internet, Software, Tutorials, Windows, Windows 7, XP and tagged Default email, Firefox, Gmail, Gmail Notifier, Google Chrome, Internet Explorer, Windows, Windows 7, Windows XP. Bookmark the permalink.
Firefox Sync vs. Xmarks
 The "Mozilla Weave" extension was recently brought out of beta testing and renamed Firefox Sync. I decided to try it out, and compare it to the add-in that I currently use for browser sync, Xmarks.
  First, the similarities: Both Xmarks and Firefox Sync work basically the same. You install a browser extension, and your bookmarks, passwords, and open tabs are kept in sync across all your browser instances (each browser on each computer that you use). This is accomplished by keeping a master copy on a server. Both Xmarks and Firefox Sync will host your data, or, for advanced users, will allow you to set up and use your own server.
There are a number of differences between the services, however:
First off, Firefox Sync doesn't work with Chrome, MSIE, Safari, or Opera, at least not yet. Xmarks works in pretty much any browser. I don't anticipate that this will be the case for too much longer, but it is worth mentioning at this stage.
The major difference between the two services is encryption. Both services encrypt the data that you send to their servers so that no one can snoop in on the traffic as it's sent over the Internet. The difference is that Xmarks can read your data on their server, and Firefox Sync cannot.
Firefox Sync encrypts your data on the client side (before it leaves the browser), and therefore its servers have no access to the data that it stores. The obvious advantage to this approach for the user is that you don't need to worry that they will sell your data, or analyze it, or do anything with it other than store it for you and allow you to retrieve it. If the servers get hacked, there won't be anything usable on them. If Mozilla turns evil and wants to snoop on you, they can't: they don't have the decryption key. You do, and it was never sent to them.
This is not to say that Xmarks' approach is a bad one. Yes, Xmarks can read your data. Therefore they can enable you to easily share portions of it. They can also provide you with easy access to your bookmarks on their website, for those instances when you don't control the browser you're using. They also keep a history of changes, so you can restore from back before you shortsightedly deleted that folder a few months (or even years) ago.

The Xmarks approach isn't all good, though. They have "discovery" features that I prefer to turn off, since their business model relies on "recommending" links, their extension will alter search results pages by default in order to show you their recommendations. Still, you can turn them off, which prevents it from being a real negative in my book.
So, what am I going to use going forward? Both, at least for now. As you can see from the screenshots above, I have disabled password and tab syncing with Xmarks, and only use that for bookmarks. This enables me to easily share certain content, use profiles, and manage my bookmarks from the web interface. There's no reason for me to have my passwords on anyone else's server in an accessible form, or my currently open tabs, for that matter, so I'm using Firefox Sync for that. Firefox Sync is also set up to sync my History, Preferences, and Settings, which is something that Xmarks can't do.
I'm syncing my bookmarks to Xmarks on my Linux box only (which is always on, and usually has Firefox open), that way it will keep up-to-date with changes that happen over Firefox Sync which is enabled and syncing everything on all of my Firefox browsers. I'm currently not doing much with Xmarks profiles, but if I want to use them in the future, I can have Xmarks handle bookmarks sync on the browsers with non-default profiles. I use Firefox by default, but I also occasionally use other browsers, so I have Xmarks set up on non-Mozilla browsers as well.
Posted by burndive at 6/10/2010 12:33:00 AM
Subscribe to:
Posts (Atom)